Personalization and creativity have become paramount in our modern society.The notebooks we use on a daily basis hold our thoughts, ideas, dreams, and aspirations. They become an extension of us. Make your own notebooks, we have the chance to infuse them with our unique style and personality. Whether it’s through the choice of colors, patterns, materials, or decorations, the possibilities for personalization are endless. This allows us to create a notebook that truly reflects who we are, inspiring us to use it more often and making the writing experience all the more enjoyable.
1.Gathering Materials and Tools
Choosing the right paper
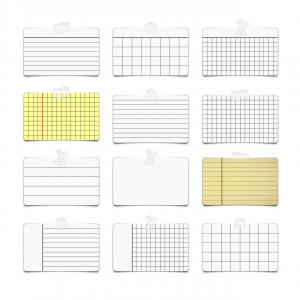
There are various types and sizes available, and the choice depends on your personal preference and usage.Consider factors like weight, texture, and durability. Popular options include lined, blank, or grid paper. Lined paper is ideal for writing, while blank or grid paper offers more flexibility for sketches or diagrams. Additionally, consider the size of the paper. Common choices are standard letter-size (8.5 x 11 inches) or A5 (5.8 x 8.3 inches), but you can customize the dimensions based on your requirements.
Exploring different cover options
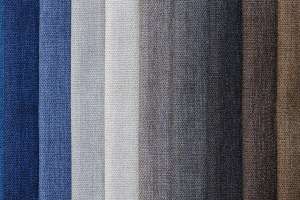
To create a unique notebook, the cover is just as important as the pages within. Cardstock, leather, and fabric are all excellent options to consider. Cardstock is readily available and offers a range of colors and patterns, allowing you to personalize your notebook. Leather covers provide a classic, sophisticated appearance and offer durability. Alternatively, fabric covers add a touch of creativity and can be easily customized with various textures and prints. Remember to choose a cover material that matches your style and preferences.
Essential tools needed
- Ruler
- Cutting mat
- Bone folder
- Awl
- Needle and thread
- Glue
2.Designing Your Notebook
Selecting themes or patterns for the cover

The cover of your notebook is its visual representation, so it’s essential to choose a theme or pattern that reflects your personality or interests. You can opt for a minimalist design with a solid colored cover, or go for something more vibrant and eye-catching with an intricate pattern or artwork.
Considering the layout and structure of the pages
The layout and structure of your notebook’s pages determine its functionality and purpose.You can choose from three common options: lined, grid, or blank pages. Lined pages are ideal for jotting down notes, while grid pages work well for sketching or organizing information. Blank pages offer maximum flexibility, allowing you to use the notebook for a variety of purposes.
Planning additional features
To make your notebook more convenient and user-friendly, consider incorporating additional features. Pockets can hold small items like receipts or sticky notes, keeping them easily accessible. Bookmarks can help you find important pages quickly, while dividers can separate different sections or categories within your notebook.
3.Preparing and Printing Pages
Organizing and formatting your content
Begin by deciding on the content you want to include in your notebook. Whether it’s lined pages for writing, grids for sketching, or a combination of both, a word processing software like Microsoft Word or Google Docs can be valuable tools for organizing and formatting your content.
First, consider the structure of your notebook. Divide your content into sections or chapters, ensuring a logical flow. For example, if you’re creating a recipe notebook, you may want sections for breakfast, lunch, dinner, and desserts.
Next, begin formatting your pages. Choose a font size and type that is easily readable, and adjust line spacing accordingly. Consider adding headers or footers to personalize your notebook or include page numbers for easy reference.
Adjusting margins and page size
To make your notebook look professional and well-organized, it’s important to adjust margins and page size to suit your needs. Margins control the space around the edges of your page, while the page size determines its overall dimensions.
Most word processing software allows you to easily modify these settings. Typically, you can find them under the “Page Layout” or “File” tab. Experiment with different margin sizes to find the right balance between aesthetics and practicality. Similarly, adjust the page size to meet your desired notebook dimensions. A standard letter size (8.5 x 11 inches) is widely used but feel free to choose a size that suits your preferences.
Utilizing templates or creating custom designs
If you’re looking for additional inspiration or want to save time, consider utilizing templates provided by the word processing software. Templates offer pre-designed layouts for various purposes, including notebooks. Browse through these options and choose the template that resonates with your style and content.
Alternatively, you can let your creativity flourish and create your own custom designs. Experiment with different fonts, colors, and formatting styles to craft a unique and personalized notebook. Add images, illustrations, or even your own artwork to give your notebook a personal touch.
4. Binding Methods
saddle stitch
Saddle stitch binding is a popular and simplistic method that involves folding and sewing pages together. To achieve this method, follow these step-by-step instructions: start by folding the pages in half, aligning them accurately. Next, use a needle and thread to sew through the fold of the pages, creating a sturdy binding. Once the sewing is completed, trim any excess thread and give your notebook a clean finish.
perfect binding
Perfect binding, provides a sleek and professional look, resembling commercially-produced notebooks. This method involves gluing the pages together and attaching a cover. Although the steps for perfect binding may seem more complex than saddle stitch, the end result is undoubtedly worth the effort. It is important to follow a comprehensive guide to ensure proper alignment, glue application, and cover attachment.
coptic stitch
Coptic stitch is a visually appealing binding technique that allows your notebook to lie flat when opened. This method involves sewing individual pages onto a spine, creating an exposed stitch pattern. While coptic stitch may require more practice and attention to detail, it offers a unique and artistic touch to your homemade notebook.
Regardless of the binding method you choose, there are a few tips and tricks to keep in mind to achieve a professional finish. First, always ensure your pages are neatly folded and aligned to prevent any unevenness in the final product. Additionally, use the appropriate threads and glues suitable for each binding technique to ensure durability and longevity. Lastly, take your time and pay attention to small details, such as trimming excess threads or applying the cover smoothly.
5. Creating a Custom Cover
A custom cover adds a personal touch and sets your notebook apart from the rest. There are various methods you can use to create a custom cover, depending on your preferences and resources.
Printing at home
Printing a designed cover at home allows you to have complete control over the design process. You can use graphic design software or online templates to create a unique and personalized cover. Once you’re satisfied with the design, you can simply print it using your home printer. This method is cost-effective and convenient, especially if you have access to high-quality printing paper.
Specialized printing services
For those seeking a more professional finish, utilizing specialized printing services is an excellent option. Printing shops or online services offer a range of customization options, such as different paper types, finishes, and binding techniques. This allows you to achieve a high-quality result that rivals store-bought notebooks. Although this option may have an additional cost, the professional outcome is worth considering for those looking for a polished and sophisticated custom cover.
Techniques for adding a personal touch
If you don’t have the resources or skills for designing or printing a cover from scratch, there are still ways to add a personal touch to a pre-made cover. You can incorporate elements like stickers, washi tape, or even hand-drawn illustrations to make your notebook unique. Additionally, using calligraphy or hand lettering techniques to write your name or a meaningful quote on the cover can add a personal and artistic flair. This DIY approach can be a fun and creative way to customize a pre-made cover without much effort.
6. Adding Extra Features
Incorporating pockets or envelopes
When creating your own notebook, one great feature to include is a pocket or envelope to hold loose papers. This will not only help you keep track of important documents, receipts, or small notes but also add a touch of functionality to your notebook. Consider using sturdy or decorative paper to create pockets or envelopes that can be easily attached to the inside cover or between various pages. This way, you can conveniently store any loose items without the fear of misplacing them.
Designing and attaching a bookmark or pen holder
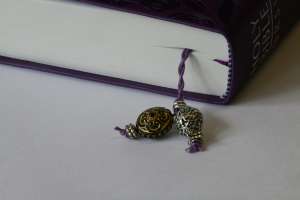

Another handy addition to your homemade notebook is a bookmark or pen holder. By designing and attaching a ribbon or elastic band to the spine or cover, you can easily mark your current page or keep a pen readily accessible. This practical feature will save you time and make your notebook more efficient. Embellish the bookmark or pen holder with beads, buttons, or charms to personalize it and make it more visually appealing.
Dividing sections with tabs or dividers for better organization
To enhance organization within your notebook, consider dividing it into sections using tabs or dividers. This allows you to categorize different topics, subjects, or projects for a clearer and more structured note-taking experience. Utilize sturdy cardstock or colored paper to create dividers, and label them accordingly. Tabs or dividers can be inserted at regular intervals throughout your notebook, providing quick access to specific sections and making it simpler to refer back to important information.
7. Embellishment and Personalization
Utilizing decorative elements
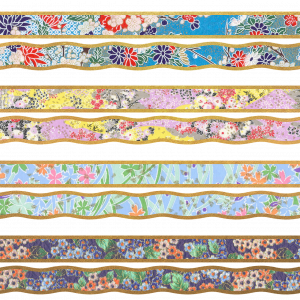
Utilizing decorative elements like washi tape, stamps, or stickers can instantly enhance the appearance of your notebook. Washi tape, with its wide range of colors and patterns, can be used to create borders, frame photos or drawings, or to simply add a pop of visual interest. Stamps offer a fun and easy way to personalize your notebook with unique designs, patterns, or even your own initials. Similarly, stickers can be used to add thematic elements, inspirational quotes, or even small illustrations.
Experimenting with various artistic techniques

If you enjoy painting, consider using watercolors to create vibrant backgrounds or to add delicate florals and patterns. Calligraphy, with its elegant and personalized touch, can be used to write inspiring quotes, headings, or even your own name on the cover or pages. For those who prefer a more tactile approach, collages can be created by layering cutouts from magazines, photographs, or printed images onto the pages, resulting in a visually rich and textured notebook.
Adding quotes, drawings, or personal photographs

Adding quotes that inspire you, drawings that reflect your interests, or even photographs of loved ones can make your notebook a truly personalized keepsake. Whether it’s a favorite poem, a sketch of your dream vacation, or a cherished memory captured in a photograph, these personal touches will not only make your notebook visually appealing but will also give it a deeper emotional value.
8. Finishing Touches
Trimming excess paper and cover edges
To achieve a professional and neat appearance, carefully trim any excess paper that may be sticking out from the edges of your notebook. Use a sharp pair of scissors or a paper trimmer for clean cuts. This step will give your creation a refined and polished aesthetic.
Applying protective coatings
To extend the lifespan of your handmade notebook, consider applying protective coatings. This will guard it against spills, stains, and general wear and tear. Various options are available, such as covering the paper surfaces with clear adhesive film or using a spray-on sealant designed specifically for paper products. Select the method that best suits your preference and ensure it’s appropriate for your notebook’s intended use.
Reflecting on the Satisfaction
Finally, take a moment to reflect on the enjoyment that comes from creating something unique and personal. Admire the notebook you’ve made, appreciating the effort you’ve invested in its creation. Crafting your own notebook not only allows you to unleash your creativity but also gives you the satisfaction of owning a one-of-a-kind item tailored to your style and needs.
make your own notebook
Using a custom-made notebook brings a personal touch to your everyday experiences. Get ready to jot down your wildest dreams, doodle your way to success, and unleash your creativity on these vibrant pages. With our notebook printing service, the possibilities are endless.Get started today!